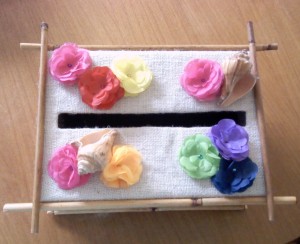
Made a card box this weekend for an engagement party. The theme was Hawaiian, so I went with a Tiki looking box. I purchased a sturdy box from the dollar store with a removable lid. Cutting the “slot” was a little difficult, but I managed. I wrapped the box and the lid in burlap and secured it with glue. I also glued two pretty shells to the lid. I purchased two lei’s and cut the string. With the loose petals I attached several together to make a more full flower and sewed a few stitches, this made it so much quicker to just have one big flower to glue to the box lid. I then glued one jeweled stone to the center of the flower. I also purchased some bamboo sticks, they were great and so easy to cut. Glue the bamboo pieces to the box and Voilà! My Tiki Themed Card Box at a small cost of $12.06 and took about 2 hours to make… Woohoo!
Tag Archive | how-to
Plans To Build Your Very Own Floating Ping Pong Table
Ugh! I have had NO NO NO time to blog, POO! I miss my weekly posts. I finally have a minute to post my newest item in my Etsy shop. Plans on how to build your own floating ping pong table for your pool. I have to say, this is one of the most USED pool items we have. My poochie Phoebe even loves to get on it and float around hahahaha, not to mention she goes crazy when the ping pong ball is going back and forth! (I posted photos quite some time ago). I have had so many compliments about my pool toy that I decided to go ahead and make the plans so you can make your very own ping pong table for your pool. The kids (and grown ups) will love it!
Buffet Side Table Given A New Life
Another project finally completed!! Took many weeks (okay months…) to get done but I am so happy with the final look of my buffet side table. Originally teak, yes it was nice, but hohumm kind of boring and I really loved the piece but I wanted a shabby chic look to it. The preparation was what took so long, the sanding, the sanding and yeah the sanding (and I HATE sanding), BUT you have to do it, and look what you get, marrrrvelous. Well I think it looks great anyways.
I achieved this look by removing all the hardware (bought some new cool knobs in a brushed silver contemporary look), I even took off the doors, I had to shave the doors upper edges because the doors just would not close properly. I then removed those nasty metal floor protectors on the bottom of the legs (I don’t know who thought metal was going to save their floors? I purchase some nice new plastic with felt nail-ons to replace them and boy are they nice, so much easier to move the buffet now). Next was the sanding, and this part takes looooong, real long. I started with an 80 grit sand paper and moved on to a 100 grit. I re-sanded with a 150 and then washed all the buffet with a damp cloth to remove all of the dust. I applied my first coat of “Painter’s Touch” satin paint in ‘Heirloom White’. Water based paint so clean up is simple. I applied a thin coat of paint, let it dry completely and sanded with a 400 grit sandpaper, remove dust with a damp cloth. I repeated this step 3 more times. Then I used a 150 grit sandpaper to sand off some of the paint here and there until I was happy with my “Shabby Chic” look. I used a damp cloth to remove any dust and applied two coats of “Saman” satin water based varnish. Again when the varnish was completely dry, I used a 600 grit sandpaper and lightly sanded the entire buffet and wiped it down with a clean damp cloth. Should be smoother than a baby’s butt! I lined the end cabinets with some pretty wallpaper. I also lined the top flatware drawer with some black velvet. Now to get started on the matching Dining room table and chairs Whewwwww… 😀
Here’s my before and after shots:


